NEGenWeb
Project
Resource Center
Schools
|
|
203 |
|
SERIES II. |
BULLETIN No. 16. |
Introduction: This bulletin contains instructions for the direction of members who have enrolled in one or all of the departments named. Each member will carefully follow all directions given in the department or departments in which enrolled.
The report blanks in this bulletin should be filled out as soon as the work is done and the accompanying report cards should be carefully filled out and promptly mailed in the accompanying self-addressed envelope.
Further bulletins and supplies will be sent to all members who carry out carefully the directions received and make the required reports, and all other privileges provided will be granted to members who complete the course.
E. C.
BISHOP,
Superintendent
April 11, 1910.
DOMESTIC SCIENCE
Gertrude N. Rowan
The work for the first month in the Home Experiment Department consists of recipes in cooking and the first four of the fundamental stitches in sewing.
All who have enrolled as members of the Nebraska Boys and Girls Club are receiving this month recipes for Chinese Muffins and and (sic) returned to the State Superintendent, Lincoln, Nebraska. (sic)
It is recommended that these recipes be tried several times during the month until the results are as nearly perfect as possible and also that the work may be done quickly.
Remember the table of measurements as it is given in the General Plans, and that all the measurements are to be level full. Read and study over the instructions in the first bulletin.
In addition to the work in Cookery, the first four of the eight fundamental stitches, which are called running, overcasting, basting and hemming, are studied. The cloth, thread and needles required for doing the work are enclosed. Read the directions very carefully before attempting the work, and be careful to keep the work as neat and clean as possible. The sewing is to be returned with the report card in cooking.
|
204 |
|
1. COOKING
2 1/4 cups flour
1 cup milk
5 teaspoons baking
3/4 cup cooked rice
1 egg well beaten
1 tablespoon sugar
1 tablespoon melted butter
1/2 teaspoon salt
Bake twenty-five minutes in buttered gem tins.
In reporting state
(a) lightness
(b) color of crust
(c) texture of crumb
(d) flavorCocoa:
3 tablespoons cocoa
a few grains salt
4 cup sugar
4 cups milk
3/4 cup boiling water Scald milk. Mix cocoa, sugar and salt with a little of the boiling milk to make smooth paste, add water and boil two minutes, pour into scalded milk. Beat with Dover egg beater, to prevent scum, until froth appears.
2. SEWING
There are eight fundamental stitches which will be studied. The first four: running, overcasting, basting and hemming are studied In this first lesson.
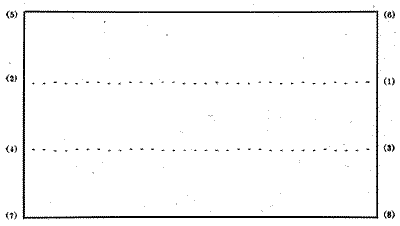
Running and Overcasting: Materials requiredPercale: 6 inches long and 3 inches wide.
Thread: No. 60 white cotton.
Needle: No. 9.
The running stitch Is a straight row of even stitches, as much cloth being taken up as is passed over each time. About ten stitches to an inch is an average size running stitch.
Thread the needle, having at least twelve inches of thread, and a very small knot at the end of the thread. Begin at the right side of the cloth at the point marked (1) and take very even, fine stitches to (2). Fasten the end by taking an extra stitch on top of the last stitch Leave one-half inch of thread.
Repeat, beginning at (3) and sewing to (4) making the second line better than the first.
|
|
205 |
Overcasting is a series of even, loose stitches over a raw edge, to prevent ravelling. Take a thread about twenty-four inches in length, tying a small knot at the end of the thread. Begin at point (5) and sew over and over, taking the stitches one-fourth of an inch down from the edge of the cloth. Take four or five stitches each time on the needle before drawing the thread through.
At point (6) leave one inch of thread after smoothing the material to see that the thread does not draw.
Turn the material around and repeat, beginning at (7) and overcasting to (8).
Basting and Hemming: Materials requiredPiece of crash 6 inches long and 3 Inches wide.
Thread: No. 50 white cotton.
Needle: No. 10.
Trim edges of material evenly, and corners square, leaving no frayed edges.
Hold material wrong side up. Begin at (1) and turn the edge In 1/8 inch, creasing with the fingernail.
Go back to (1) and fold again, creasing firmly.
Basting is sewing to hold materials in place for fitting or final sewing. The stitches are even, and take up as much material as is passed over.
Thread a needle with about eighteen inches of thread, tying no knots.
Begin at (1) leaving one inch of thread, take stitches inch long, and straight through the center of the hem.
Leave an inch of thread at (2). Do not fasten the basting thread.
|
206 |
|

Turn material around and repeat, beginning at (3) and finishing at (4).
Thread the needle using about eighteen inches of thread. Tie no knot. Begin at (1), hold the needle on a line with the material. Take up one thread of the cloth and one of the fold. In beginning leave one inch of the thread which is put under edge of hem and sewed over. Make the stitches as close as possible, slanting and as nearly invisible on the right side as possible. After completing, finish side (3) to (4) in same way.
1. COOKING
Pot Roast:. . Select a four or five pound piece of beef from the rump, wipe with a damp cloth, trim off all excess fat. Put in a kettle with one pint of boiling water, cover very tightly. Let simmer slowly until tender when pierced with a fork -- about four hours, adding a little water as needed. Thirty minutes before removing from the fire add 1 teaspoon salt and 1/8 teaspoon pepper.
At the end of four hours the meat should be a rich brown color and so tender that the fat and bone will naturally separate itself from the lean of the meat when lifted out on the platter.
Brown Gravy: Add enough boiling water to the liquor in the kettle to make 11/2 cups. Let boll, and beat in with a fork 1/2 cup water and 1/4 cup flour which have been thoroughly rubbed together.
Boll three minutes, season, and strain if necessary.
Dumplings:
|
1 cup flour |
1/4. teaspoon salt |
|
1 teaspoon baking |
2 teaspoons butter |
power |
3/4 cup milk or water |
Mix and sift the dry ingredients, rub in butter with tips of fingers,
|
|
207 |
add milk gradually stirring with a knife. Place by tablespoonfuls on buttered pie tin, steam for twelve minutes. Arrange on the platter with meat, a spoonful of gravy over each dumpling.
2. SEWING
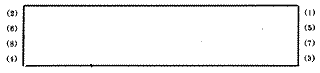
Overhanding: Materials required
Cross-bar muslin: 6 inches long and 4 inches wide.
Thread: No. 80 white cotton.
Needle No. 10.
Cut the cross-bar muslin in two pieces, each 6 inches long and 2 inches wide. Trim evenly on all sides, leaving no frayed edges. See that all corners are perfect.
Carefully turn, baste, and hem sides (1) to (2), (3) to (4), (5) to (6), and (7) to (8) according to directions in the last lesson.
Overhanding is the sewing together of folds or selvages with small stitches taken over the edges.
Baste together pieces (A) and (B) holding right sides together with edges (4) to (3) and (5) to (6) together.

Thread the needle, tying a very small knot. Begin at the point where (4) and (5) are joined, insert the needle at (4) and straight through (5) keeping the needle at right angles with the goods and the point toward you. Take up only two threads at a time on each piece. When finished fasten end firmly by taking three stitches, one over the other, and cut thread close to work.
Open the seam thus made; and press flat with the fingernail.
Baste the strip of lace on the side (1) to (2), holding right sides together with the lace toward you. Begin at point (1).
Care must be taken to hold the lace loosely enough so the lace will not draw after the overhanding.
|
208 |
|
After basting, the same overhanding on seam (4) to (3) and (5) to (6) is used to sew the lace on the material. Take very fine stitches. Draw out bastings and open the seam, pressing firmly.
Machine Made Apron
The pattern for this machine made apron is on the following page. On the scale each square equals one inch. To make the pattern rule a piece of plain paper in one inch squares and then copy the pattern from the scale to the ruled sheet. After making careful drawings of the band, skirt of the apron, and pocket, cut them out carefully.
Then cut a straight piece 1 1-2 yards long and 2 1/2 inches wide for ruffling pattern. It is desirable to patch the ruffling as little as possible.
Cut also a pattern for the strings 30 inches long and 3 1/2 inches wide.
Cut a bias 1 yard long and 1 inch wide.
In making the apron, gingham, calico, or cross-bar muslin may be used. Lay the pattern with the straight edge on a lengthwise fold of the material and pin. Pin the band in the same way, having the material doubled. Pin the patterns for the ruffle, two strings and the bias on the material. Be sure that the pattern is arranged to be as economical with the material as possible. Then cut carefully following the pattern.
1. Join the ruffling and baste the hem 1/8 of an inch wide. Stitch the hem carefully on the machine.
2. Gather the ruffle, using thread double. Begin in the center of the piece and have each thread one yard long. Stroke the gathers so the ruffle will go in smoothly.
3. Pin the ruffling at points (1) and (2), regulate the fulness by means of the gathering thread, and baste, holding wrong sides together. Fold the bias in 1/4 of an inch on each side. Open the seam and fold on the right side. Baste the bias on the right side of the apron, covering the raw edge made by the ruffle. Stitch twice, once on each edge.
4. Put a 3/4 inch hem on the pocket. Turn in 1/4 inch and locate as indicated on the pattern. Stitch.
5. Put a 3/4 inch hem on the end of the strings, and 1/8 inch on the sides. Stitch the two pieces of the band together. Gather the top of the apron, using two threads. Scratch the gathers and baste on the band, basting the end of the ruffle in also. Spread the gathers so they come within two inches of the end of the band. Turn the band and baste. Stitch once across the top of the band and twice across the bottom, and twice where strings are inserted.
The apron may be trimmed with lace around the ruffle, across the top of the pocket and the ends of the strings.
|
|
209 |
There will be prizes offered for exhibit of these aprons at the County Contest, State Fair and the State and National Corn Shows.
Fill out report card and send in promptly.
SWEET PEAS AND HOW TO GROW THEM
By Val Keyser.
In order to encourage the cultivation of flowers by our Nebraska boys and girls, a few suggestions concerning Sweet Pea culture are added to this bulletin.
There is, perhaps, no other flower that furnishes such a variety of colors, and which can be grown under such varied climatic conditions, as the Sweet Pea. If properly cared for, a short row of Sweet Peas will furnish beautiful, fragrant bouquets for the adornment of the house from May to August. It requires so little attention that we cannot afford to miss the pleasure of having these flowers.
There are dozens of valuable varieties of Sweet Peas which can be secured from any of the seed houses. The varieties known as the Spencer Type are considered the strongest growers and most profuse bloomers. They can be purchased as separate varieties or mixed. It is almost always better to buy different varieties and mix the seed to suit one's fancy. It is very interesting to work out the color combinations in this manner.
Perhaps the most important step in the succesful growing of Sweet Peas is to have them properly planted. The following directions should be carefully observed. Dig a trench ten to twelve inches deep and at least one foot wide. Fill in the bottom of this trench four to six inches of well rotted manure, taken from the cow stables. Cover the manure with about two inches of good soil and pack this down firmly. Then fill in with a little loose dirt, perhaps a half inch, and plant the seeds. Place them about three to the inch in the trench. Cover these with about two and one-half inches of well firmed soil; this will leave the trench slightly hollow, which will aid in watering. Be sure to use plenty of water so that the manure in the bottom of the trench will be thoroughly soaked. It will heat slightly and hasten the germination of the peas. Dig the trench the long way north and south. It is, as a rule, better to have the rows running north and south. A double row from eight to twelve Inches apart is usually best. If the trench Is carefully prepared the seed can be planted on each side and the trellis placed In the center to support both rows.
|
210 |
|
Sweet peas are climbers and need a trellis for support. A strip of woven wire fence, thirty inches high is excellent for this purpose. A strong stick can be set at each end of the row to support the wire.
Keep the ground well hoed and moist until the peas are two to three inches high, then apply a top dressing of well rotted manure, being careful not to cover the vines. The ground must be kept well watered, not flooded, neither should it be allowed to become dry and hard. As soon as the peas commence to bloom, the flowers should be clipped. A neglected flower will furnish a seed pod in a few days. These pods should be carefully picked off and the period of bloom will thereby be greatly lengthened.
Sometimes Sweet Peas are severely damaged by mildew; In which case they may be sprayed with a weak solution of Bordeaux Mixture. The most serious trouble, however, is the Red Spider, which can be largely prevented by the use of water. Where hydrant water is used so that the pressure is sufficient, by watering the vines from the bottom up, the work of the spider will be greatly lessened. In cases where hydrant water is not accessible, the vines should be sprayed in the same manner with some forced spray. A small pump for this purpose to quite inexpensive. Where the vines are badly infested, a solution of soap-suds in which a little tobacco is dissolved, will kill the spider.
The reason for planting the rows north and south is to avoid direct rays of the sun. Sweet Peas will do well when partly shaded. They like a cool, moist climate.
Care should be taken not to place the trench near the roots of large trees as this trench, made as above described, will furnish a very rich soil, which would encourage the growth of the trees and sap the fertility and moisture which should go to the support of the Sweet Peas.
If the above directions are carefully followed, an abundance of beautiful, fragrant flowers should be produced.
|
|
211 |
|
SERIES II. |
BULLETIN No. 17. |
Directions for Sewing, Receipts for Cooking for Nebraska Boys' and Girls' Club.
INTRODUCTORY DIRECTIONS
This bulletin contains information and directions for the home work for June and July. Each member should read very carefully all directions and should as carefully follow the directions in each case. Where satisfactory results are not secured the first time, the work should be repeated more carefully until the member is successful and has become proficient in the particular work undertaken.
Most of the April and May reports received at this time are made out in a creditable manner. A few reports indicate undue haste and carelessness. Let us have each report neatly, accurately, and completely filled out for the June and July work. Use ink if possible. Send reports in promptly when the work has been satisfactorily completed. Those failing to report will be dropped from the membership roll. We now have nearly 3,000 members doing this work and cannot afford to keep on the list any who do not do their part. The reports received so far indicate some excellent work by our members.
Members will be given a chance next fall at county and state meetings to exhibit their skill. Any member who makes the regular reports and fails to receive bulletins will be supplied at once on receipt of notice to me. The work outlined in this bulletin will be found especially interesting and profitable both in the sewing and in the cooking departments.
We cannot now enroll additional members. Those already enrolled may loan their bulletins to others and may direct those who do not have instructions in any part of the work in which they may be interested.
Each member can be useful in her home and in her community by giving to others the information and direction which will enable them likewise to participate in the enjoyment of being able to skillfully perform the operations necessary in accomplishing good things in domestic science and art.
B. C. BISHOP.
June 1. 1910.
Lincoln, Nebraska.
|
212 |
|
June-July
Gertrude N. Rowan
During the month of June there will be a continuation of the work in cooking and sewing in the Home Experiment Department. In addition to this, there is a brief study of bacteria, yeasts, and molds preliminary to some work in canning and preserving.
Before beginning this month's work, study over the table of measurements in the "General Outline," Bulletin No. 12; be sure that all measures are level full, and that the work is neatly done. It is advised that the recipes for emergency puddings, warm apple sauce, and hard sauce be tried several times before the report card is sent in. The report card in cooking should not be mailed until all the recipes are tried and fully described on the card. Ink should he used whenever possible in filling out the cards.
In the first column insert the date upon which you tried the recipe, in the second column the names of the articles made, in the third a list of all the ingredients in each article in the order used. Under the heading "Method of Combining" describe in detail the way the ingredients are put together. Under "Process" describe the cooking, whether the article is boiled, broiled, steamed, baked, fried or simmered, and the exact "number of minutes" the process continued; in the "Results" column the texture of the crust, consistency, flavor, and any other qualities of the food that may need description.
On the sewing report cards, describe the holders and the garden hat in detail.
When all the work for June in both cooking and sewing is completed, enclose the report card in sewing, the report card in cooking, and the calico, soft muslin, and striped gingham and mail in one of the self-addressed envelopes.
In July, white bread, baked pears, blackberry jam, and preserved strawberries are prepared and the July report card on cooking filled out. The Dorothy seam on flannel, and hooks and eyes on black percaline are to be returned with the report card on sewing on which you are to describe the garden hat you make. These report cards are to be returned during July in the self-addressed envelope.
Bacteria, Yeasts, Molds: Canning and Preserving. Before going to the work of canning and preserving it is well to understand the process thoroughly and to know the conditions which make so many precautions necessary.
Successful canning and preserving depends, first, upon the destruction of all bacteria, yeasts and molds present in the vegetable or fruit; and, second, upon perfect sealing so that no new germ is admitted. Great care must be taken in order to prevent the spoiling of any goods kept for winter use.
The first precaution is to use earthen or granite ware utensils,
|
|
213 |
and to use only silver or wooden spoons for stirring; second, cook thoroughly the material so that all germ life is entirely destroyed; third, cleanse thoroughly with boiling water the glass or can in which the material is to be kept, fill the hot receptacle over full while the material is at boiling temperature, and seal the receptacle at once.
Vegetables are prepared as for sauce, observing all precautions as noted above. Fruits are prepared for winter use in many different ways:
(1) Canned or bottled fruit juices.
(2) Jellies -- cooked fruit juice and sugar in equal amounts.
(3) Canning and preserving -- sterilized fruit sweetened to taste.
(4) Marmalades and Jams -- the pulp and juice of fruits with equal amounts of sugar.
(5) Pickling -- preserving in salt or acid liquor.
Bacteria, yeasts, and molds are such small plants or animals that they cannot be seen with the naked eye, but they exist everywhere in the air, water, ground, food products, and even in our own bodies. The smallest and simplest of these plants are called bacteria. They take their food from the air or surrounding material, then give off as waste products, gases or liquids. These waste products may do harm or good. In the case of ptomaine poisoning we see the harm they do. Another common example of the work of bacteria is the souring of milk.
In the second class are found the yeast plants with which we are all familiar. We put the yeast in the bread. It grows, and while growing throws off alcohol and a gas which is called carbon dioxide. The bubbles of gas cannot break through, so they raise the whole mass of dough.
The third class are the molds which form a velvet-like substance in bread, on meat, leather, and canned goods. Other forms of mold are mildew, ringworm, and molds on the skin.
Sunlight and draughts of air retard or destroy germ life. The best way to avoid germ life in food is either to keep the food in a refrigerator or very cold place, or else to boil or bake the food before using. The best way to avoid the germ life In the various rooms of the house is to air thoroughly the rooms, admit all the sunlight possible, and keep as free from dust as possible.
All that has been said of the house applies to the barns and milk rooms as well.
Since this germ life is so commonly present in putting up fruits for winter use, great care must be exercised to destroy all germs in the jars or glasses and covers, and to prevent any others getting in while the fruit is being stored.
To prevent germs in the fruit a reliable recipe should be carefully followed.
To prevent germs in the jars or glasses and covers they must be put In cold water and brought gradually to a boiling point and boiled
|
214 |
|
for ten minutes. Keep the water boiling and remove the utensils one at a time as the cooked fruit is ready.
After filling the jars, put the rubber band in place and screw on the cover. When the jar is cool, tighten the cover and wipe the outside of the jar with a damp cloth. Since moisture and warmth are favorable for germ growth, all fruit should be stored in a dry, cool place.
1. COOKING:
Emergency Puddings:
1 cup flour.
1/2 teaspoon sugar.
1 tablespoonful baking powder.
Water for a soft dough.
1/4 teaspoon salt.
Mix and sift dry ingredients and add water gradually, stirring with a knife. Place by tablespoonfuls on a buttered pie-tin. Steam ten minutes in a closed steamer.
Warm Apple Sauce:
Pare apples very thinly, quarter and core. Slice and put in granite pan with 1/2 cup water. Cover tightly and cook slowly until apples are tender when pierced with a tooth pick. Then add sugar to taste, and stir over the fire for about three minutes. The June apples will require about 1/2 cup sugar to one pint of the sauce.
Hard Sauce:
1 cup powdered sugar.
Few drops vanilla extract.
1-3 cup butter.
Few grains salt
Cream the butter, add the sugar gradually after sifting, then add the salt and vanilla extract.
Canned Cherries:
6 quarts cherries.
1 1/2 quarts sugar.
1/2 pint water.
Measure the cherries after the stems have been removed. Stone them or not as you please. If you stone them be careful to save all the juice. Put the sugar and water in, the preserving kettle and stir over the fire until the sugar is dissolved. Put in the cherries and heat slowly to the boiling point. Boil ten minutes, skimming carefully.
2. SEWING:
Stitching and Backstitching: Materials required
Calico: 6 inches long and 3 inches wide.
Thread: No. 60 white cotton.
Needle: No. 7.
Cut material in two pieces, each 6 inches long and 11/2 inches wide. Straighten and trim the edges, and square the corners. Place pieces with right sides together, and baste 1/2 inch from edges along the sides (1) to (2) and (3) to (4).
|
|
215 |
Stitching
Stitching is a series of long forward stitches and short upper back stitches.
Beginning at (1), 1/4 inch from the edge of the cloth, take a long forward under stitch. On the upper side set the needle back one-half the length of the first stitch and repeat.
Begin at (3) and repeat to (4).
Overcast all sides to the depth of 1/2 inch.
Beginning at (5), take a long forward under stitch. On the upper side set the needle back the full length of the first stitch and repeat.
Begin at (7) and repeat to (8).
Felled Seam: Materials required. Soft muslin: 6 inches long and 4 inches wide. Thread: No. 80 white cotton. Needle: No. 9.
Cut the muslin in two pieces each 6 inches long and 2 inches wide Trim evenly on all sides, leaving no frayed edges. See that all corners are square.
A felled seam is a seam which is hemmed down to conceal the edges, wherever a flat seam is wanted, as on underwear.
Baste the two pieces along one of the 6 inch sides, holding right sides together. Stitch carefully. Trim one of the edges 1/2 inch below the other, and fold the wider edge over the narrow. Baste the folded seam flat on the material and hem, making the stitches as close together as possible, and as small on the right side as possible.
Buttons and Buttonholes: Materials required
Striped gingham: 8 inches wide and 4 inches long.
Buttons: 3 four-holed pearl.
Thread: No. 50 white.
Needle: No. 7.
Cut the gingham in two pieces each 4 inches wide and 4 inches long, trimming edges neatly. Turn in one long side of each piece one inch on the wrong side. Turn in again one inch, baste, and hem with very fine, even stitches. This makes three thicknesses of cloth for the buttons and buttonholes.
On one piece mark off three places for buttonholes. Find the
|
216 |
|
width of the button, put the points of the scissors 1/4 inch from the edge of the material and cut along a thread the exact size the buttonhole is to be.
Begin at the edge farthest from the folded edge and overhand the edges of the buttonhole closely, taking the stitches three threads deep. Have no knot. Begin at the same place, put the needle in the material with the point toward you, draw it half way through, take the two threads at the eye of the needle and carry them under the needle from the right. Draw the needle out so the thread is drawn from you to bring the loop thus made to the raw edge. Have the stitches an even distance apart.
Work around the corner by slanting the stitches so the buttonhole is rounding at. the end. When the end is finished work across the side to the point opposite where the buttonhole was started.
This end is finished with a bar. To make the bar, draw the needle down through the first loop, then up through the last one, and draw the stitch tight to bring the sides of the buttonhole close together. Take three more stitches in the same place. Work four buttonhole stitches over these threads, having the loop on the edge of the buttonhole. Draw the thread through on the wrong side and fasten firmly. Make the other three buttonholes in the same way.
To locate the buttons pin the material with the buttonholes on the piece to be used for the buttons with the two hems exactly overlapping.
With pins indicate the location of the button. The center of the button should come in the circular end of the buttonhole.
After the four buttons are located, and it is certain the buttons and buttonholes will be opposite when finished, then sew on the first button as indicated in the cut.
Double the thread and tic a small knot in the end. Put the needle through from the right side first, then back through the button in order to hide the knot. Place a pin across the top of the button and sew over it, always keeping the threads straight and running parallel with the direction of the buttonhole. Sew through each pair of holes five times; take the pin out, then bring the thread out between material and button and wind thread around the stitches underneath the button several times. This prevents the buttonhole wearing the threads through so quickly
Sew the remaining three buttons on in the same way. Button the two pieces together.
There will be two holders, one a small square, one to be worn at the belt while cooking, the other a long one for handling large kettles and baking dishes.
1. To make the small one, cut a piece of blue denim or bed
|
|
217 |
ticking 7 inches wide and 18 1/2 inches long. Turn in 1/2 inch on the two long sides and on one short side. Press firmly. Then fold the cloth three times so there are no raw edges and the piece when folded is 6 Inches square.
2. Baste 1/4 inch from edge on all four sides. Overhand. Draw out bastings.
3. To keep the holder firm and in shape stitch in two diagonal rows from corner to corner, crossing in the center of the holder.
4. Sew a piece of tape 3/4 yard long on one corner of the holder. Fasten to the belt of the apron with a safety pin.
5. To make the long holder, cut a piece of denim or bed-ticking 1-2 yard long and 1-3 yard wide. Turn in 1-2 inch on all sides and press firmly. Fold so the holder is 1-2 yard long and 6 inches wide. Baste and overhand on three sides. Draw out the bastings.
1. COOKING:
White Bread:
1 cup scalded milk.
1 cup boiling water.
1 tablespoon lard.
1 1-2 teaspoons salt.
1 yeastcake dissolved in 1/4 cup lukewarm water.
6 cups sifted flour, or one cup white flour and enough entire wheat flour to knead.
1. Put liquid, lard, butter, and salt in bread raiser or large bowl. When luke warm, add yeast, stir with a knife or mixing spoon until small bubbles appear. Add one-half of the flour, beat thoroughly. Let stand until it doubles in bulk. Knead down with remaining flour. Let rise until it will rebound when pressed with finger.
2. Knead, shape into loaves or biscuits. Let rise, bake. Place in hot oven for first ten minutes. Reduce heat to moderate oven for remainder of time. An ordinary loaf requires 45 to 60 minutes for baking.
This recipe may be varied by using one-half graham, rye, or entire wheat flour.
Baked Pears:
Wipe pears and cut in halves. Put in deep pudding dish, and sprinkle with sugar. Add water to prevent burning. Cover tightly and cook in a very slow oven for three hours. Pears should turn a reddish color and be very soft. If the pears are small, they may be baked whole.
Blackberry Jam:
Pick over blackberries. Mash a few in the bottom of a preserving kettle, using a wooden potato masher; continue until all the fruit is used. Heat slowly to boiling point and add gradually an equal
|
218 |
|
quantity of heated sugar. Cook slowly forty-five minutes. Put in a stone jar or tumblers.
Preserved Strawberries:
Use equal weights of sugar and strawberries. Put the strawberries in the preserving kettle in layers, sprinkling sugar over each layer. The fruit and sugar should not be more than four inches deep. Place the kettle on the stove and heat the fruit and sugar slowly to the boiling point. When it begins to boil skim carefully. Boil ten minutes, continuing from the time the fruit begins to bubble. Pour the cooked fruit into platters, having it two or three inches deep. Place the platters in a sunny window in an unused room for three or four days. In that time the fruit will grow plump and firm and the syrup will thicken almost to a jelly. Put this preserve, cold, into jars or tumblers.
2. SEWING:
Dorothy Seam on Flannel: .
Materials required
Flannel: 6 inches long and 4 inches wide
Thread: white silk A.
White binding ribbon: 6 inches.
Needle: No. 10.
Cut the flannel into two pieces each 6 inches long and 2 inches wide. Baste together, matching the figure.
Back-stitch the seam 1/4 Inch from edge of material. With just a warm iron press the seam open.
Lay the binding ribbon on the wrong side of the flannel with the center of the ribbon over the seam. Baste. Hem the edge of the ribbon down to the flannel with very fine stitches. Be careful that the stitches do not show on the right side. Draw out the bastings and press again.
Hooks and eyes: Materials required
Black percaline: 4 inches long and 8 inches wide.
Hooks and eyes: 3 No. 2 black.
Thread: No. 50 black cotton.
Needle: No. 7.
Trim material evenly on all sides and cut in two pieces each 4 Inches long and 3 inches wide. Turn in one long side of each piece one inch on the wrong side. Turn in again one inch, baste, and hem with very fine even stitches. This makes three thicknesses of cloth for the hooks and eyes. Draw out the bastings and overcast the other three sides of each piece, according to the directions for overcasting.
Thread the needle and tie a very small knot.
On one piece of the percaline mark off three places for hooks, an even distance apart. Set the hook in 1/4 inch from the edge of the
|
|
219 |
goods, hold firmly in place and take one stitch through each loop of the hook and five stitches back of the patent hump to keep the head of the hook firmly in place. Then take five stitches through each of the loops, fasten the thread well and cut close to the work.
Sew on the other two hooks in the same way.
To locate the eyes, pin the material with the hooks to the piece to be used for the eyes with the edges of the two hems exactly meeting. Indicate by marking with a pencil the places where the eyes are to be sewed on. Let each eye project just far enough over the edge of the material to allow the hook to catch in the eye easily.
When certain that the eye is in just the right position according to the cut, catch it in place by taking a stitch through each loop. Then take three stitches at each side of the eye on the edge of the goods. These should be very small stitches, but firm to keep the eye from shifting. Then take five stitches through each loop and fasten thread firmly. Cut thread close to material and sew the other two eyes on in the same way.
Garden Hat: Directions for making
The pattern for a garden hat is on the opposite page. On the scale each square equals two inches. To make the pattern, rule a piece of plain paper in two inch squares, then copy the pattern from the scale to the ruled sheet. After making a careful drawing of the three pieces, cut them out carefully.
The hat requires 1 1/2 yards of 27-inch material or 1 1/4 yards of 36-inch. Pink and white or blue and white checked gingham is recommended. White goods or embroidery may be used if desired.
Three-eighths of an inch is allowed for seams. In cutting the brim (A) cut an inside and an outside piece, and if the goods is very thin cut an interlining of white muslin. Stitch together the sections for the brim along the outer edges and ends, turn right side out and finish the head edge with a narrow binding; lap the ends of the brim 3/8 inch and close with buttons and buttonholes. Sew small buttons to the upper side of brim at the single eyelets. Line the tabs and work a buttonhole in each at the single eyelet. Work buttonholes at the points indicated by eyelets.
Hem the ties, and fasten to each side of the brim underneath at the second eyelet from the closing.
 |
 |
 |
 |
|
© 2003 for the NEGenWeb Project by Ted & Carole Miller |
|||