Take a piece of one-inch square Swede iron, hold the iron diagonally over the anvil, with your left hand a little toward the horn, the end of the iron to reach out over the outside edge of the anvil. Now strike so that the sledge and hammer will hit half face over the anvil and the other half of the sledge and hammer outside of the anvil.
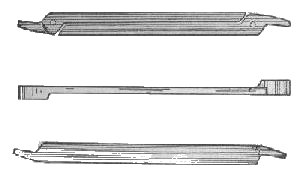
Hammer it down to about three-eighths of an inch thick. Now pull the iron towards you straight across the anvil, give it one half turn toward yourself so that this side which was up, now will be towards yourself; the end that first was outside the anvil now to rest over the inner edge of the anvil, push the jaw up against the anvil until it rests against the shoulder made in the first move. Now hammer this down until it is the thickness of the jaw that is desired. Next, turn it over, with the bottom side up or the side that was down, up; push it out over the outside edge of the anvil again so far that the shoulder or set down you now have up, will be about an inch outside and over the edge of the anvil, now give a few blows to finish the jaw, then finish the shanks and weld in half inch round iron to the length desired. The jaws should be grooved with a fuller, if you have none of the size required take a piece of round iron and hammer it down in the jaws to make the groove. Tongs grooved this way will grip better. Next, punch a hole in one jaw, place it over the other in the position wanted when finished, then mark the hole in the other jaw, and when punched rivet them together, the jaws to be cold and the rivet hot. The following story will suggest to you how to finish it. An apprentice once made a pair of tongs when his master was out, and when he had them riveted together could not move the jaws. As he did not know how to make them work he laid them away under the bellows. At the supper table the apprentice told his master the following story: An apprentice once made a pair of tongs and when he had them riveted together he could not move the jaws, and as he did not know what to do he simply threw them away, thinking he must have made a mistake somehow. "What a fool," said the master, "Why didn't he heat them." At the next opportunity the apprentice put his tongs in the fire and when hot they could be worked very easily.
Take a piece of tool steel 1 ¼ inches square, heat it red hot. Now remember here it is that the trouble begins in handling tool steel. If, in the process, you ever get it more than red hot, it is spoiled, and no receipt, or handling or hammering will ever make it good again. The best thing in such a case is to cut off the burnt part in spite of all proposed cures. This must be remembered whenever you heat tool or spring steel. If the burnt part cannot be cut off, heat it to a low heat, cool it in lukewarm water half a dozen times, this will improve it some, if you can hammer it some do so. Now punch a hole about two inches from the end with a punch that will make a hole 1 1/8 x 3/8. If the punch sticks in the hole, cool it off and put a little coal in the hole that will prevent the punch from sticking. This is a good thing to do whenever a deep hole is to be punched. Be sure that the hole is made true. Next, have a punch the exact size of the hole wanted when finished, drive it in and hammer the eye out until it has the thickness of about 3/8 of an inch on each side and has a circle form like No. 2, Figure 5.
In order to do this you may have to heat the eye many times, and upset over it with the punch in the eye. This done put in the bottom fuller and with the top fuller groove it down on each side of the eye, like the cut referred to. Now dress down the face then the peen-end. When finished harden it in this way: Heat the face-end first to a low red heat, dip in water about an inch and a half, brighten the face and watch for the color. When it begins to turn blue cool off but don't harden the eye. Wind a wet rag around the face end and heat the peen-end, temper the same way. With a piece of iron in the eye, both ends can be hardened at the same time, but this is more difficult, and I would not recommend it.
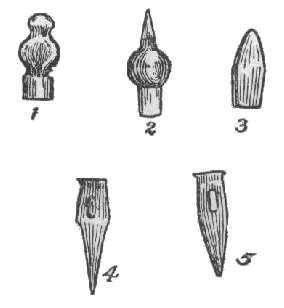 |
For ordinary blacksmithing a flat peen hammer is the thing, but I have seen good blacksmiths hang on to the machinist's hammer as the only thing. See No. 1, Figure 5. This hammer is more ornamental than useful in a blacksmith shop. The hammer should be of different sizes for different work, light for light work, and for drawing out plowshares alone the hammer should be heavy.
For an ordinary smith a hammer of two up to two and one-half pounds is right. Riveting hammers should be only one pound and less. No smith should ever use a hammer like No. 3, in Figure 5. This hammer I have not yet been able to find out what it is good for. Too short, too clumsy, too much friction in the air. I have christened it, and if you want my name for it call it Cain's hammer. It must surely look like the hammer used by him, if he had any.
A chisel for hot cutting, see Figure 5, No. 4. This chisel is made of 1 ¼ square tool steel. Punch a hole 1 1/8 x ¼ x ½ about three inches from the end, the eye should be narrow in order to leave material enough on the sides to give it strength. When eye is finished, forge down below it, not on the head-end, with top and bottom fullers, like cut. This gives the chisel a better shape. Now dress down the edge, then heat to a low cherry red, and harden, brighten it and when the color is brown cool off.
Use same sized steel as above referred to, make it like No. 5, Figure 5. To distinguish it from the hot cutting chisel, and to give it more strength, in hardening this chisel, draw the temper until it is blue. This is the right temper for all kinds of cold chisels.
One might think that anybody knows how to make a set hammer, if every smith knows it, I don't know, but I do know that there are thousands of smiths who have never had a set hammer nor know its use. To make one: Take a piece of tool steel 1 ¼ x 1 ¼ inches, punch a hole about two inches from the end, the hole to be 1 ¼ x 3/8. Now cut off enough for head. Make the face perfectly square and level, with sharp corners, harden and cool off when the temper turns from brown to blue. This is a very important little tool and for cutting steel it is a good deal better than the chisel. Plow steel of every kind is easier cut with this hammer than any other way. In cutting with the set hammer hold the steel so that your inner side of the set hammer will be over the outside edge of the anvil. Let the helper strike on the outside corner of the set hammer and it will cut easy. The steel to be cut should be just a little hot, not enough to be noticed. If the steel is red hot the set hammer cannot cut it. The heat must be what is called blue heat. I would not be without the set hammer for money, and still I often meet smiths who have never seen this use made of the set hammer. Plow points, corn shovels, and seeder shovels are quicker cut with this tool than any other way, with the exception of shears.
Twist drills are not easy to make by hand, as they should be turned to be true, but a twist drill can be made this way. Take a piece of tool steel round and the size of the chuck hole in your drill press. Flatten it down to the size wanted, heat, put the shank in the vise, take with the tongs over the end and give one turn to the whole length, turn to the left. When finished be sure that it is not thicker up than it is at point, and straight. Now harden, heat to a low cherry red, cool off in luke-warm water—salt water, if you have it—brighten it and hold over a hot bar of iron to draw temper, cool off when brown, the whole length of the twist should be tempered.
Another way to make a drill is to just flatten the steel and shape to a diamond point and bend the shares forward. This is a simple but good idea and such drills cut easy. In cooling for hardening turn the drill in the water so that the edge or shares are cooled in proportion to point, or the shares will be too soft and the point of such a drill too hard. Our trade journals, in giving receipts for hardening drills, often get watch-makers receipts. This is misleading:
watch-makers heat their drills to a white heat. Now, remember, as I have already said, when your drill or tool of this kind is heated to this heat the best thing to do is to cut that part off. It is different with watchmakers, they do not look for strength, but hardness. They run their drills with a high speed, cut chips that cannot be discerned with the naked eye, and must have a drill that is hard like a diamond. For drilling iron or steel the drill does not need to be so very hard, but tough rather, because of the slow speed and thick chips. Few smiths have been able to master the simplest tempering, and they think if they could get a complicated receipt they would be all right. We are all more or less built that way. Anything we do not understand we admire.
 |
Simple soft water and the right heat is, in most cases, the only thing needed for hardening. I had occasion to consult a doctor once who was noted for his simple remedies. A lady got some medicine and she wanted to know what it was so she could get it when the doctor was not at home, but he refused to reveal it to her. When the lady had left the doctor told me the reason why. "This lady," said the doctor, "does not believe in simple remedies which she knows, but believes in those remedies she knows nothing about." I think it is better for us to try to understand things and not believe much in them before we understand them.
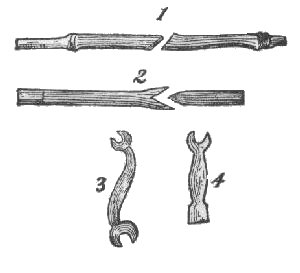
See Figure 6, No. 3. This wrench is for 3/8 nut on one end and ½ on the other, just the kind for plow work. To make one, take a piece of tool steel 1 ½ x 5/8 start as you see in No. 4, Figure 6. Set the jaws down with the fullers, punch a round hole as in end No. 4, cut out from hole and finish the jaws to make the right length, now bend it in S shape and finish. This makes the best wrench. Do not heat over a red heat.
Few blacksmiths know how to make a rock drill. Take a piece of round or octagon steel, the desired length and thickness, shape it, but it must be remembered that if during the process you ever get it over a red heat there is no use to proceed, but just cut off that much and start again, no hardening will prevail if it is burnt. The trouble begins when you put the steel into the fire, and you must watch until you have it finished. When ready to harden heat it to a cherry red heat, cool in water not too cold, brighten and watch for temper. When it is yellow, cool it off, but not entirely, take it out of the water before it is quite cold and let it cool slowly, this will make the drill both hard and tough. By this simple process I have been able to dress drills and get such a good temper than only two per cent would break. Another way to harden is to heat to a very low heat and cool it off entirely at once. A third way is to temper as first stated and when yellow set the drill in water only one half an inch deep and let it cool. By this process a good per cent will break just at the water line.