HOW TO MAKE PLOWSHARES
 HERE are two kinds of shares: lip shares and bar shares, and they must be treated differently. We will first treat of bar shares. The first thing to do when a plow is brought for a new lay is to look over the condition of the landside. By landside is meant the bar to which the share is welded. Now if this bar is worn down so that you think it too weak to stand for a new share, then make a new one.
For a 14-inch plow take 2 ½ x 3/8, or 2 ½ x 7/16. For a 16-inch plow, use 2 ½ x 7/16 or 3 x 7/16 common iron. Cut the iron diagonally at the point. This will prepare a point on each side of the cut; that is, you had better cut out two landsides at a time. But if you do not want to do that, then cut the iron off square. Next take a piece of common iron 3 X ¼, 13 inches long for a shin; cut this diagonally, and it will make shins for two. Some plow factories use steel for shins, but that is not necessary, for it will not make the plowshare any better, but, on the
 |
other hand, will be quite a bother when you want to drill a hole for a fincoulter if it is hardened. Place this shin on the land side of the landside, and weld. In preparing the shoulder of the shin for the plate use a ship upsetter. See No. 3, Figure 8.
Not one out of 500 blacksmiths have this tool. Every smith should have one. You cannot do a good and quick job without it.
When you shape the point of the landside hold it vertical, that is, the edge straight up and down, or plumb. If you don't do this, there will be trouble in welding, especially if you have held it under. Then it will lean under the square when welded, and in such a case it is hard to get a good weld, and if you do you will break it up when you attempt to set it to the square. Another thing, don't make much slant on the landside up at the joint, for, if you do, you can never weld the share good up there. Give more slant towards the point. Be sure to have the right curve. It is very important to have the landside right: 1, Because it is the foundation for the plow; 2, if the landside is right the start is right, and then there is no trouble to get the share right. When finished place the old landside on top of the new, with the upper edges even; don't go by the bottom edges, as they are worn. Now mark the hole. You may leave the front hole for the foot of the beam this time. When holes are drilled, then put a bolt through the hole of the foot of beam and landside; now place the plow on the landside and measure 14 inches from the floor up to the beam. In this position mark the front hole of the foot of the beam. If the beam has been sprung up you will now have remedied that. So much about a new landside. On the other side, if the old landside is not too much worn to be used, then repair as follows:
Take a piece of 3/8 inch thick flat iron the width of the landside about ten inches long. Cut one end off diagonally, this end to be flattened down. Why should this end be cut diagonally? This piece of iron is to be placed on the inner side of the landside and as far back as to cover the hole that holds the plate. Now, if this iron is cut square off, and left a little too thick on that end, it will cut into the landside and weaken it; but if cut diagonally and drawn out thin it will not weaken, nor can it break when cut in this manner. To be sure of a good strong weld, upset over the weld. I hold that this is the most important thing in making a new lay. "No hoof, no horse" — no landside, no plow. There are only a few blacksmiths recognizing this fact. Most of the smiths will simply take a piece of iron about half an inch square and weld it on top of the point. This is the quickest way, but it is also the poorest way, but they cannot very well do it in any other way, for if you have no shin upsetter to dress and shape the shoulder for the plate, then it is quite a job to repair any other way. There are three reasons why a landside cannot be repaired with a patch on top of the point: 1, The shin or shoulder in an old landside is worn down sometimes to almost nothing, and the only way to get stock enough to make a good shoulder is to put a good-sized piece of iron on the inside, back and behind this shoulder. If a new plate is to be put on and this is not done, you will have to draw down the plate to the thickness of the old shoulder, and in such a case the plate will add no strength to the share. 2, The landside is, in many cases, worn down on the bottom to a thin, sharp edge, and by placing the piece on top the landside will be as it was on the bottom side, where it ought to be as thick as you can make it. 3, The weakest place in the landside is just at the shoulder of the shin, and by placing the piece on top it will not reach over this weak place, and with a new long point on, the strain will be heavier than before. and the landside will either bend or break. I have in my experience had thousands of plows that have been broken or bent on account of a poorly-repaired landside. Blacksmiths, with only a few exceptions, are all making this mistake.
The landside is to the plow what the foundation is to the house. No architect will ever think of building a substantial house without a solid foundation. No practical plowsmith will ever try to make a good plow without a solid landside.
For prairie or brush breakers, where no plate is used, it will be all right to repair the landside by placing a piece of iron on top of it, provided it is not much worn, and the patch reaches back far enough to strengthen the landside. But even in such cases it is better to lay it on the inner side.
We have now learned how to prepare the landside for a solid or long bar share. We shall now learn how to make a landside point for slipshares. There are smiths that will take the old worn-out stub of a share point, weld a piece to it, and then weld the share on. This is very ridiculous and silly. There is nothing left in such a point to be of any use. Make a new one; be sure to make it high enough—at least half an inch higher than the share is to be when finished. This will give you material to weld down on. If the landside is not high enough the share will be lower— that is, the joint of the lay will be lower than the joint of the mouldboard, and it should be the other way.
 |
On this point many an old smith and every beginner makes mistakes, and not only in this case, but in everything else. Whatever you have to make, be sure to have stock enough to work down on, and you will be all right. It is better to have too much than not enough.
In shaping the point remember to hold it perpendicular, and give very little slant up at the joint, but more towards the point. If too much slant up at the joint there will be difficulty in welding it. Remember this. Don't make the point straight like a wedge; if you do the share will be above the frog. Give it the same circle it had, and the share will rest solid on the frog. This is another important point to remember: The lay will not have the full strength if it don't rest on the frog, and it will not be steady, and the plow will not run good, for in a few days the share flops up and down.
When a 14-inch share is finished the point, from the joint of the share to the extreme end of the point, should be 11 inches, not longer, and for a 16-inch lay, 12 inches, not longer. The point acts as a lever on the plow, and if it is too long the plow will not work good, and it is liable to break. Shape the point so that when you hold it up against the plow it will be in line with the bottom of the landside, but about half an inch wider than the landside to weld on. If it is a plow where the point of the mouldboard rests on the land side point, and it is a double shin, then cut out in the landside point for the point of the mouldboard to rest in. See No. 1, Figure 9. This will be a guide for you when welding the share, and it will slip onto the plow easier when you come to fit it to the same. I think enough has been said about the landside to give the beginner a good idea of how to make one. And if the landside is right, it comes easier to do the rest. In making a plowshare there are many things to remember, and one must be on the alert right along, for it will give lots of trouble if any point is overlooked.
We will now weld a share to a long bar landside. The landside having been finished and bolted to the beam or its foot, or to a standard, the share is to be shaped to fit. Hold the share up to the plow. First look if the angle for the point is right in the share; if not, heat the share, and if under the angle wanted upset up at the joint; if over the angle wanted, drive it back at the point. In doing this hold the edge of the share over a wooden block instead of the anvil, so as not to batter the thin edge of the share. If the share has been upset so that it has a narrow rib along the point where it is to be welded, draw this down and make it level.
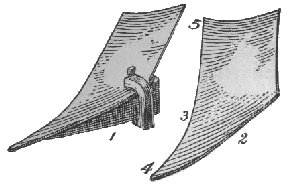 |
In most blank shares the point should be raised to fit the landside point, so that when the same is placed on the floor the edge of the share will follow the floor or leveling block (if you have it), from the heel right up to the point, then it will be easy to make the edge come down to the square in finishing it up. If this is not done the edge of the share from the throat back will generally be too high.
In Figure 9 two shares are represented, one with the landside point on ready for welding. In this share the point of the same has been raised so that the share comes down to the square in the throat. The other is a blank share, straight in the point between Nos. 4 and 5. resting on the extreme heel and point with gap between the edge of share and floor at No. 3. In most blank shares the point is too straight, and the point too much bent down at No. 4. Bend the share so that the whole length from heel to point will follow the floor. When the share is held in a position as shown in this cut, don't fit the share to the brace, for in most old plows the brace has been bent out of shape. Fit the share to the square, and then fit the brace to the share, and you are right. Many a blacksmith will never think of this, but it is important
Next joint the share; that is, if the joint does not fit the joint of the mouldboard, make it fit either by filing or grinding. This done, make the holes, and when you center-punch for same draw the holes a trifle; that means make the center mark a little towards the inner side of the mark, especially for the hole next to the point. This is also an important point overlooked by most blacksmiths. The holes that hold the joints together should act as a wedge. If they don't the joints will pull apart and leave a gap between, where dirt and straw will gather, and if a slipshare the share will soon work loose and the plow will flop.
The holes having been punched and countersunk, the share should be bolted to the brace. Next put on the clamp. It is not necessary that the clamp should be put on while the share is on the plow. I never do that. I used to for many years, but there is no need of doing it, for if the share has the right angle it must come to its place when even with the point on the outside, and a cut should be made in the landside just at the place where the point of the mouldboard rests on same, this cut will also be a guide.
Now a few words concerning the clamp. Figure 8, No. 7 illustrates a clamp for this purpose. The set screw at the bottom serves to hold the landside from leaning over or under, while the setscrew at the upper end holds the share against the point. If this clamp is rightly made it works splendid. The clamp should be placed over the plowshare up at the joint, because the first heat or weld should be on the point. Some smiths —well, for a fact, most smiths—take the first weld up at the joint. This is wrong. The point should be welded first. Then you have a chance to set the share right and fit it snug to the point the whole way up. You cannot make a good weld if the share does not fit snug against the landside point, to prevent air and cinders from playing between. Further, the share should be upset over the weld, when this is not done in the blank share; the lower corner of the share will protrude over the landside. This should be dressed down smooth. The next weld should be taken up at the joint. For welding compound use steel borings and scales from either steel or iron.
After you have moistened the place where the weld is to be taken with borax, then fill in between the share and point with steel borings, and on top of this a little steel or iron scales. Do not buy any welding compound of any kind, because if you learn to know what you have in the shop you will find that there never was a welding compound made to excel borax, steel scales, steel or iron borings, and powdered glass. All these you have without buying.
In heating go slow. If you put on too strong blast the share will burn before the iron is hot enough to weld. When ready to weld let your helper take with a pair of tongs over the share and landside to hold them tight together while you strike the first blow. Use a large hammer and strike with a pressure on the hammer the first blows, until you are sure it sticks; then come down on it with force.
I have made it a practice, no matter how good this weld seems to be, to always take a second weld. This weld to be a light one. The share and landside are after the first weld settled, so it takes very little to weld them then. On the other hand, the first weld might look to all appearances solid, but it is not always. With this precaution I never had a share that ripped open in the weld, while it is a rare thing to find a share made by a blacksmith that does not rip. Now, then, weld down toward the point. The point should not be allowed to have any twist, for if it does, it will turn the plow over on the side. Now set the edge right, beginning at the heel. If the share is made for hard fall plowing give more suction than for a share for soft spring plowing. Grind and polish before you harden, and after it is hardened touch it up lightly with the polish wheel. Much polishing or grinding after hardening will wear off the case hardening.
We shall now weld a slipshare. When the point is finished hold it to the plow with a pair of tongs while you fit the share. When the share is fitted take the point off from the plow and fasten it to the share with the clamp. As I have said before, there is no need of fastening the share to the landside point with the plow as a guide. If the landside and share are right there cannot be any mistake, and it comes easier to screw them together over the anvil. Now proceed as with a long bar share, and when the weld up at the joint has been taken, fit the share to the plow while hot. Some smiths in preparing the landside point for a slipshare will place the share so that the point is a little too short back where it rests against the end of the plate. This is a bad idea. It is claimed that, in welding, the landside point will swell enough to make it reach up against the plate. This is true, if the landside point is only high enough; but if it is low and you lose a heat in welding, as most smiths do, then your landside point will be both too low and too short. Thousands of shares are made every year that have this fault. Therefore, whatever you are doing have stock enough. It is easy to cut off from the landside while yet hot, but it is difficult to repair if too short. No share will work steadily if the point does not rest right against the plate.
In blacksmithing, every beginner, and many an old smith, makes the mistake of providing less stock than is needed for the work to be done. It is essential to have material to dress down on; and if a heat is lost, or a weld, it will make the stock in the article weaker, and to meet these exigencies there must be material from the start, enough for all purposes.
There is also a wide difference of opinion as to whether the share should be welded at the point or at the joint first. While I was yet a young man and employed in a plow factory, I had an opportunity to see the different ideas set to a test. In the factory the practice was to weld the point first. A plowman from another State was engaged, and he claimed that it would be better to weld the share first up at the joint. He was given a chance to prove his assertion, and the result was that 3 per cent of his shares broke over the inner side of the landside at the joint in the hardening, and 10 per cent ripped up in the weld at the same place. These are results that will always follow this method.
The first, because the share was not upset over the weld; the second, because a good weld cannot be taken unless the share is dressed down snug against the point when hot. As far as the number of shares welded per day was concerned, this man was not in it. Still, this man was a good plowman, and was doing better than I ever saw a man with this idea do before. For it is a fact, that out of one thousand plowshares welded by country blacksmiths, nine hundred and ninety will rip up. I have been in different States, and seen more than many have of this kind of work, but, to tell the truth, there is no profession or trade where there is so much poor work done as in blacksmithing, and especially in plow work. Blacksmiths often come to me, even from other States, to learn my ideas of making plowshares. On inquiring, I generally find that they weld a piece on the top of the old landside and proceed to weld without touching the share or trying to fit it at all. We need not be surprised at this ignorance, when we know that it is only fifty years since John Deere reformed the plow industry entirely and made the modern plow now in use. It is impossible for blacksmiths in the country to have learned this part of their business, in so short a time, successfully. Still, I have seen blacksmiths prosper and have quite a reputation as plowmen, while, for a fact, they never made a plowshare that was, from the standpoint of a practical plowman, right.
Chapter 6
Chapter 4
Return to Main Page
© 2000, 2001 by Lynn Waterman